Broadcasts
Broadcasts let you send one campaign message to many contacts at once, using the channel and content you choose. In ChatMaven, creating a broadcast is a three-step wizard: define the message, choose who receives it, then test or run the send.
This guide describes the ChatMaven screens. For a general picture of how broadcast lists, statuses, and limits work in products like ChatMaven, you can also read external overviews (for example Broadcasts overview on respond.io). The steps and fields below match ChatMaven, not third-party products.
Getting here
Open Broadcasts from the top navigation (next to Dashboard, Inbox, Contacts, and Analytics). From there you can start Create New Broadcast and see existing campaigns.
Who can use broadcasts may be limited by your workspace or role; if you do not see Broadcasts, ask an administrator.
What you’ll see outside the wizard
On the main Broadcasts area you typically get an overview of each campaign: status, when it was sent or scheduled, name, channel, which lists or segments were targeted, recipient counts, and message totals. You can often switch between table and calendar views to scan past and upcoming sends.
Statuses usually progress like this (wording may vary slightly in the product):
| Status | Meaning |
|---|---|
| Draft | Saved but not scheduled or sent yet. |
| Scheduled | Set to go out at a future time; canceling may return it to draft. |
| In progress | Messages are currently being sent. |
| Completed | Sending has finished; delivery still depends on each channel. |
| Failed | The broadcast could not be completed as attempted. |
Opening a broadcast from the list usually shows a details view with timing, audience, channel, counts, and a message preview.
Create New Broadcast — overview
The wizard title is Create New Broadcast. A stepper shows Broadcast Details, Contact Selection, and Test and Execute. Use Next and Back at the bottom to move between steps. Save as Draft keeps your work without sending. Cancel exits (you may lose unsaved changes). X in the corner closes the flow.
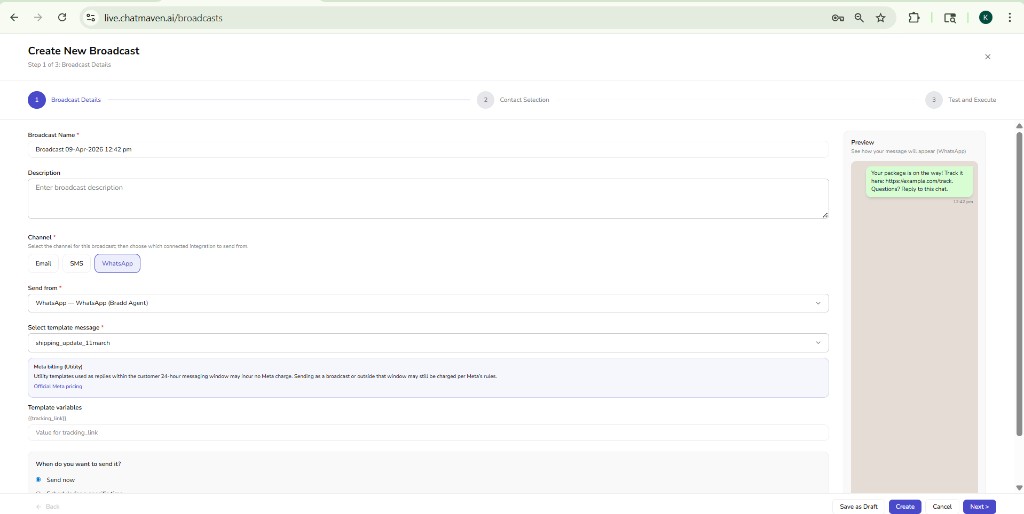
Step 1: Broadcast Details
Configure the campaign name, channel, message template (where required), variables, schedule, and preview the result.
| Field | Description |
|---|---|
| Broadcast name | Required. Identifies the campaign in your list (a default timestamped name may be suggested). |
| Description | Optional notes for your team. |
| Channel | Required. Choose Email, SMS, or WhatsApp (toggle-style controls). |
| Send from | Required. Pick the connected account or sender for that channel (for example a WhatsApp-connected agent). |
| Select template message | Required when the channel uses templates (for example WhatsApp). Choose an approved template. |
| Template variables | For each placeholder in the template (for example {{tracking_link}}), enter the value to merge into the message. |
| When do you want to send it? | Send now or Schedule for a specific time (radio options). |
Preview (right side) shows how the message will look for the selected channel (for example a WhatsApp-style bubble). It updates as you change the template and variables.
Meta billing (WhatsApp): When you use WhatsApp, an info area may remind you that Meta bills certain template categories (for example utility) separately. Use Official Meta pricing links from the product when you need the latest rates.
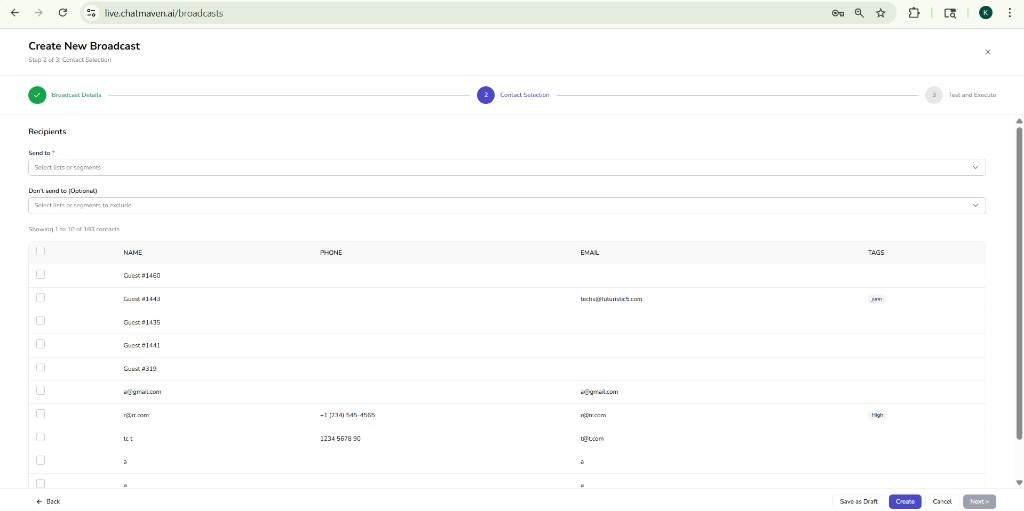
Step 2: Contact Selection
Choose lists or segments to include and optionally exclude. The contact grid helps you see who is in scope.
| Field | Description |
|---|---|
| Send to | Required. Select one or more lists or segments that should receive the broadcast. |
| Don't send to | Optional. Lists or segments to exclude from the send (for example suppressions). |
Below the selectors, a table lists contacts with Name, Phone, Email, and Tags. A header checkbox can select all rows in the current page; row checkboxes select individuals. Pagination text (for example “Showing 1 to 10 of …”) shows how many contacts match your current view.
Next may stay disabled until required selections are valid.
Step 3: Test and Execute
Review the preview, send a test to specific addresses, then run the broadcast or save as draft.
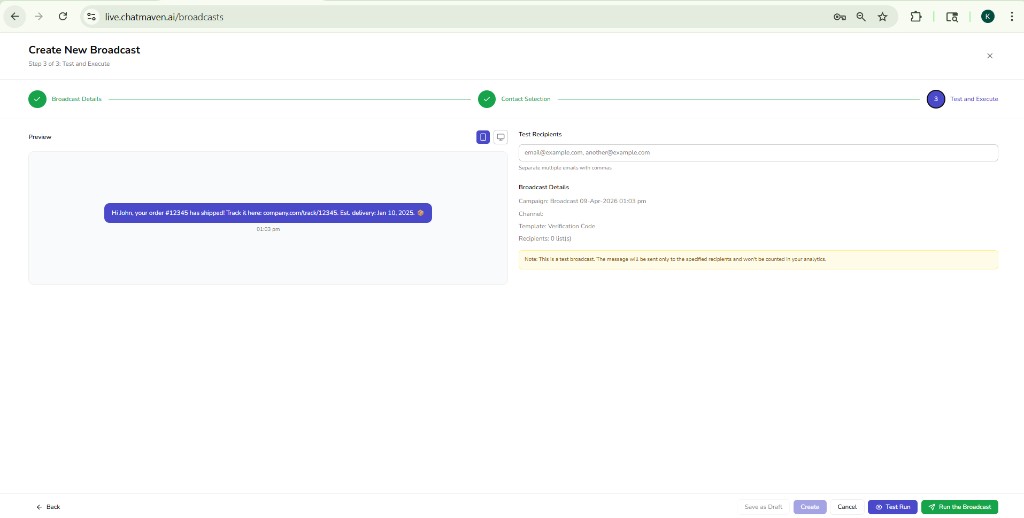
Preview supports mobile and desktop toggles so you can sanity-check layout.
| Area | Description |
|---|---|
| Test recipients | Enter addresses (for example emails) separated by commas to receive a test send only. |
| Broadcast details | Summary of campaign name, channel, template, and recipient lists. |
| Test notice | Explains that a test send goes only to the addresses you entered and is not included in analytics like the full broadcast. |
Footer actions typically include:
- Test Run — sends using the test recipient list.
- Run the Broadcast — executes the real send to the audience you defined in Step 2 (subject to channel rules and your plan).
- Back, Save as Draft, Create, Cancel — same roles as in earlier steps where shown.
Limits and channel rules
Plans and integrations can cap how many broadcast messages you may send in a period. Usage is often counted by messages sent, not only by number of campaigns. Check Billing and usage in your account for ChatMaven-specific limits.
Channel providers (especially WhatsApp) require approved templates for many outbound messages and enforce quality and volume rules. See Getting ready for promotional messaging and WhatsApp templates for Meta-specific preparation.
Related articles
- Segments — Build reusable audiences for Send to / Don't send to.
- Contacts overview — Manage the contact list behind broadcasts.
- Billing — Usage lines that may include broadcasts.
- Getting ready for promotional messaging — WhatsApp broadcast and template requirements.