Shopify Integration
Shopify is one of ChatMaven’s commerce integrations. When you connect a Shopify store to an agent, ChatMaven can embed a storefront chatbot that answers product and order questions, and send automated WhatsApp messages when Shopify order and cart events fire — without leaving ChatMaven.
This page covers what the Shopify integration is, what you need before you start, how to connect your store, and what to do next.
What is Shopify in ChatMaven?
In ChatMaven, Shopify appears as an integration card under Agents → Integrations. Connecting it links your Shopify store to the selected agent so that:
- Shoppers can chat with your agent on the storefront (order status, products, and related questions)
- ChatMaven can access orders and products through Shopify OAuth after you authorize the connection
- You can send approved Meta WhatsApp templates when Shopify webhooks fire (order created, fulfilled, cancelled, abandoned cart, COD tracking)
The Shopify panel has three tabs: Overview, Setup, and Automations. After you allow access in Shopify, ChatMaven shows the store as Connected and the Integrations card toggle turns on.
Shopify features at a glance
| Feature | Where in ChatMaven | What it does |
|---|---|---|
| Store connection | Integrations → Shopify → Setup | Links your Shopify store by domain via OAuth (no API key) |
| Chatbot embed | Shopify → Overview → Add to a Website | Adds the chat widget to your storefront |
| WhatsApp automations | Shopify → Automations | Sends order-event WhatsApp templates |
Step-by-step guides for each feature:
Prerequisites
Before you connect Shopify, make sure you have:
- A ChatMaven account and access to the agent you want to connect
- An active Shopify store and its myshopify.com domain (for example
your-store.myshopify.com) - Store owner or staff permission to approve app installation in Shopify Admin
For WhatsApp automations only, you also need:
- WhatsApp Business API connected to the same agent
- At least one approved Meta WhatsApp template to select per automation
- A customer phone number on the order or checkout (automations skip events without a phone)
Have your store domain ready. ChatMaven only asks for the domain in Setup — you authorize access on Shopify’s Install app screen. You do not need an API key or custom app token.
How to connect ChatMaven to Shopify
Follow these steps in order. The images below match the live ChatMaven and Shopify screens.
Watch the Shopify connection video
Watch the video below for a walkthrough of connecting Shopify to ChatMaven. You can also follow the written steps in this guide.
Open the Shopify connection video on Google Drive in a new tab if the player above does not load.
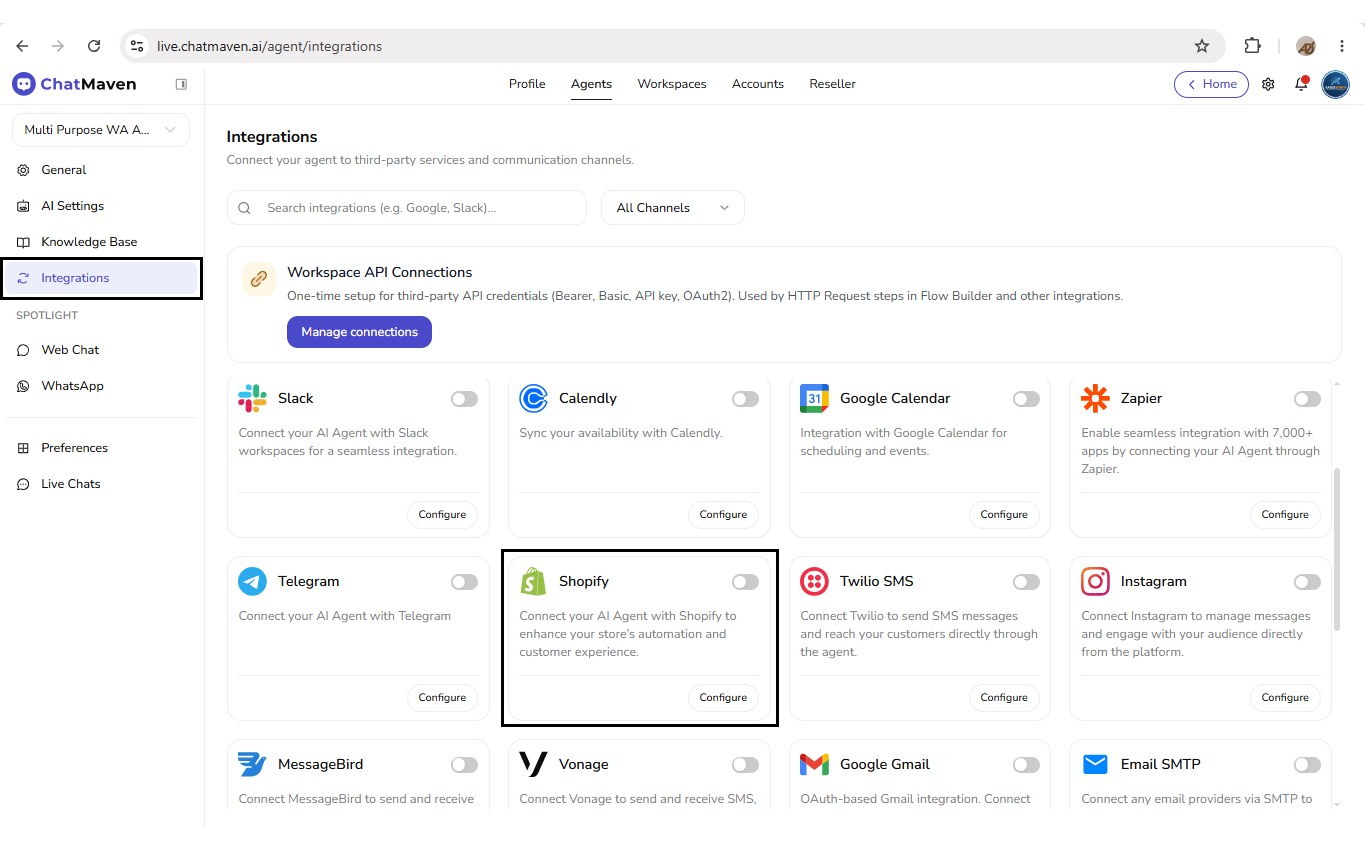
Step 1: Open Integrations and find Shopify
- In ChatMaven, open Agents.
- Select the agent you want to connect.
- Go to Integrations.
On the Integrations page you will see a grid of channel cards. Locate the Shopify card. Its description reads: Connect your AI Agent with Shopify to enhance your store’s automation and customer experience.
Step 2: Click Configure
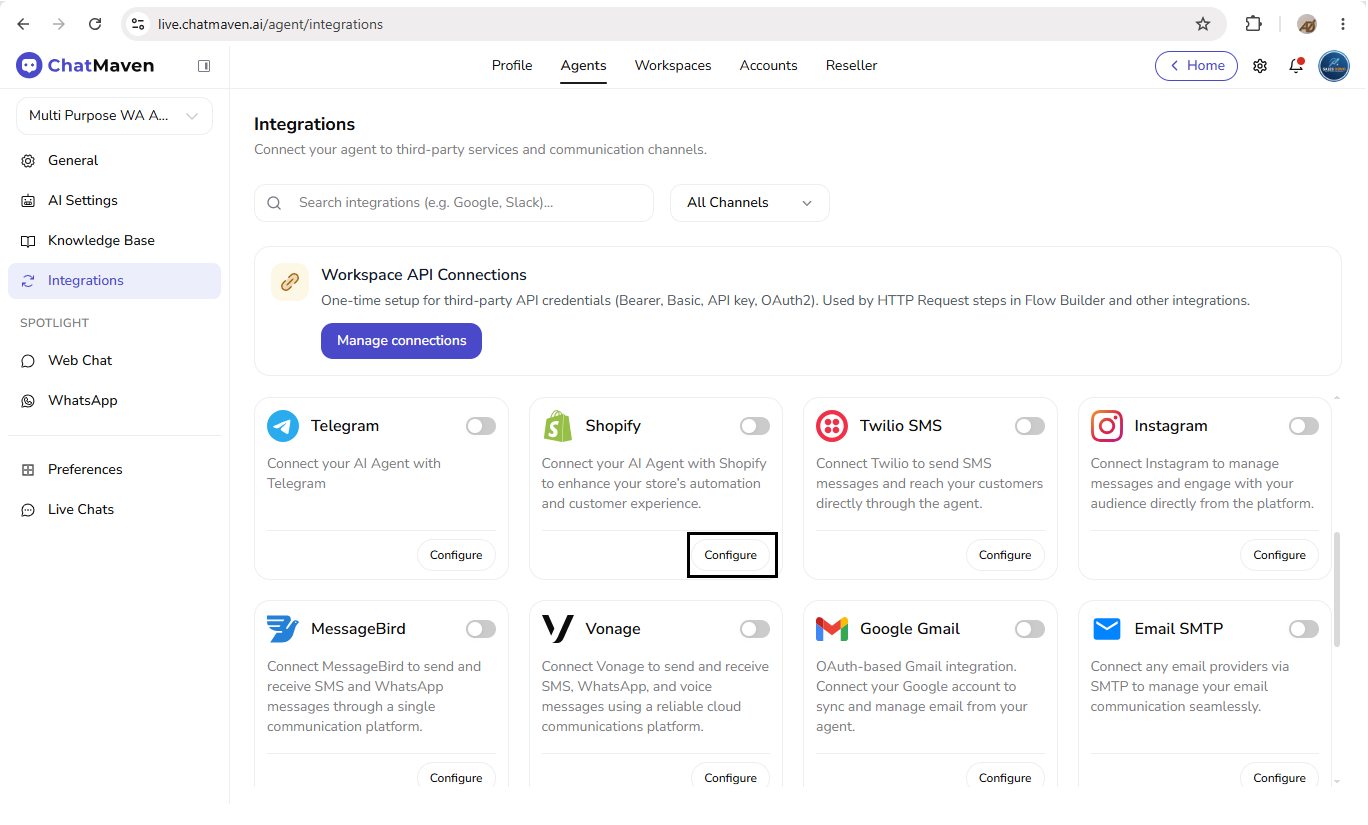
On the Shopify card, click Configure to open the Shopify setup panel.
Step 3: Connect and enter your store domain
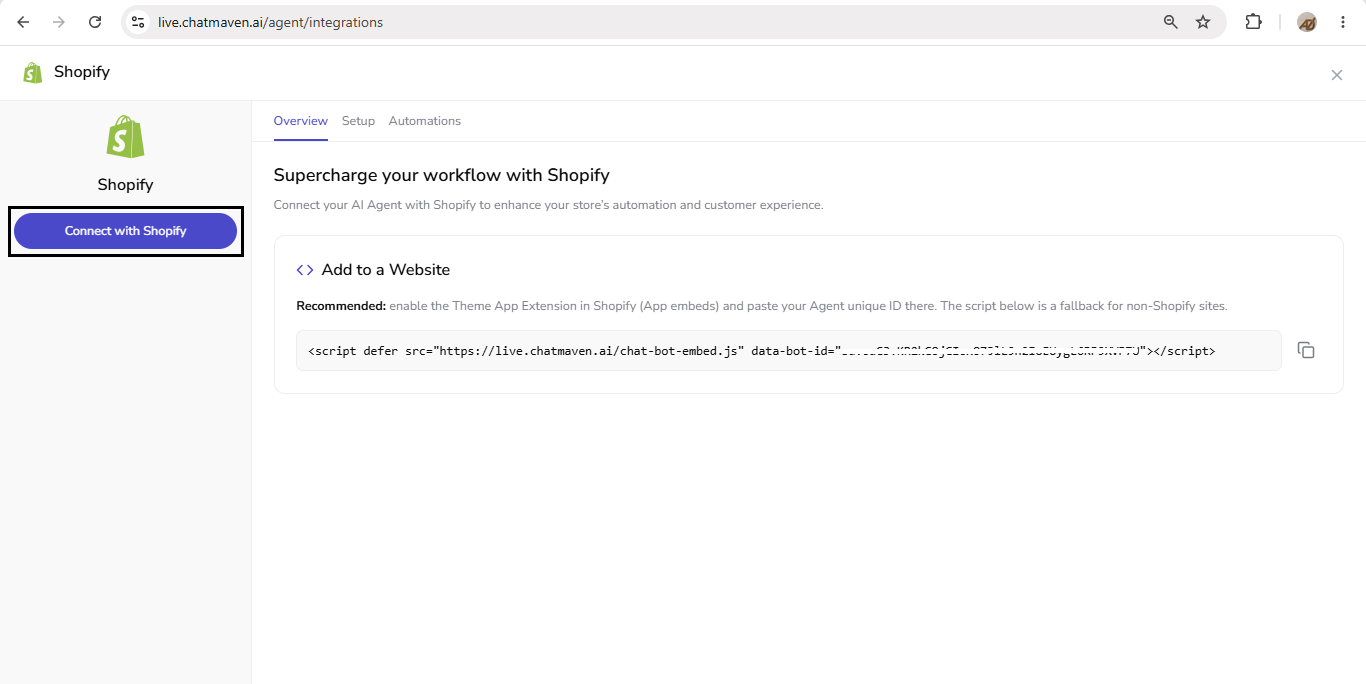
The Shopify panel has a left rail and an Overview / Setup / Automations area.
While the store is not connected yet:
- The left rail shows Connect with Shopify
- Overview shows the heading Supercharge your workflow with Shopify and a short description of what the integration is for
- Add to a Website already shows your agent embed script (you will use this after connect)
Click Connect with Shopify, or open the Setup tab.
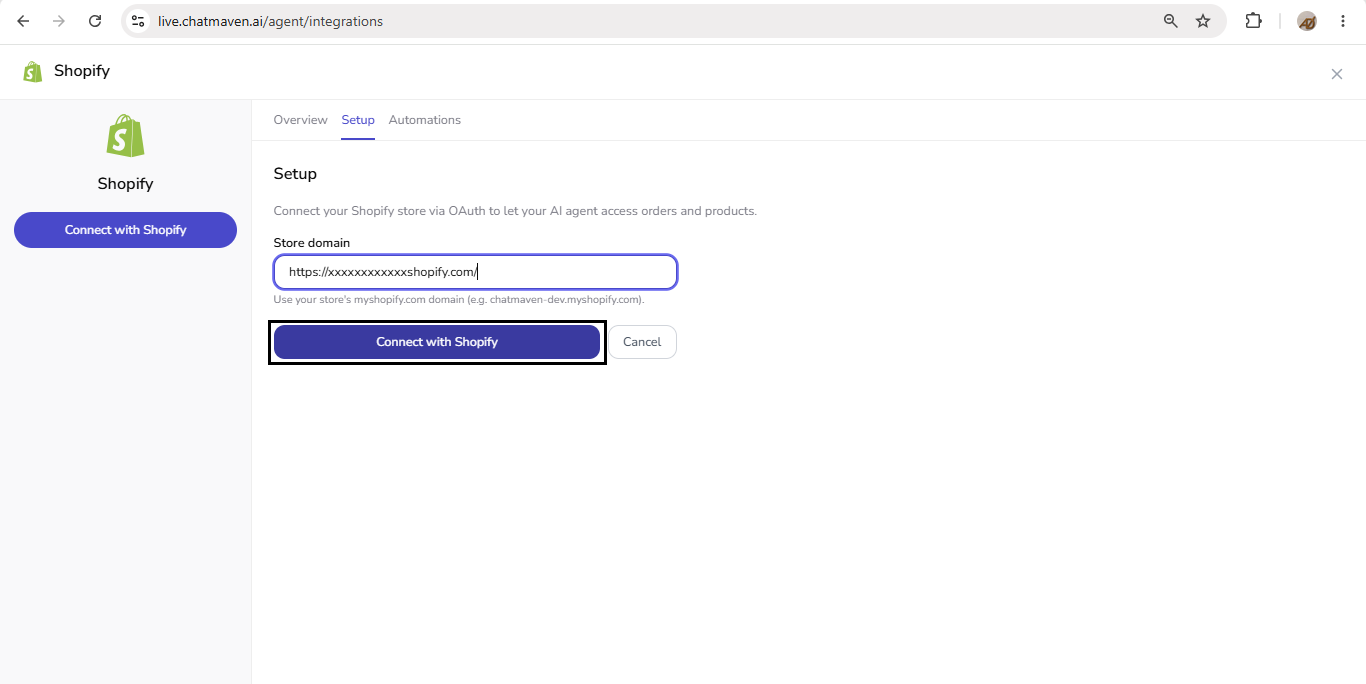
On the Setup tab:
- Confirm the heading Setup and the copy: Connect your Shopify store via OAuth to let your AI agent access orders and products.
- In Store domain, enter your store’s myshopify.com domain. You can use either the short form or the full URL — for example
your-store.myshopify.comorhttps://your-store.myshopify.com/. - Use the help text under the field as a guide: Use your store's myshopify.com domain.
- Click Connect with Shopify.
ChatMaven redirects you to Shopify so you can authorize the ChatMaven app for that store. No API key or manual token is required.
Step 4: Approve ChatMaven’s Install app request
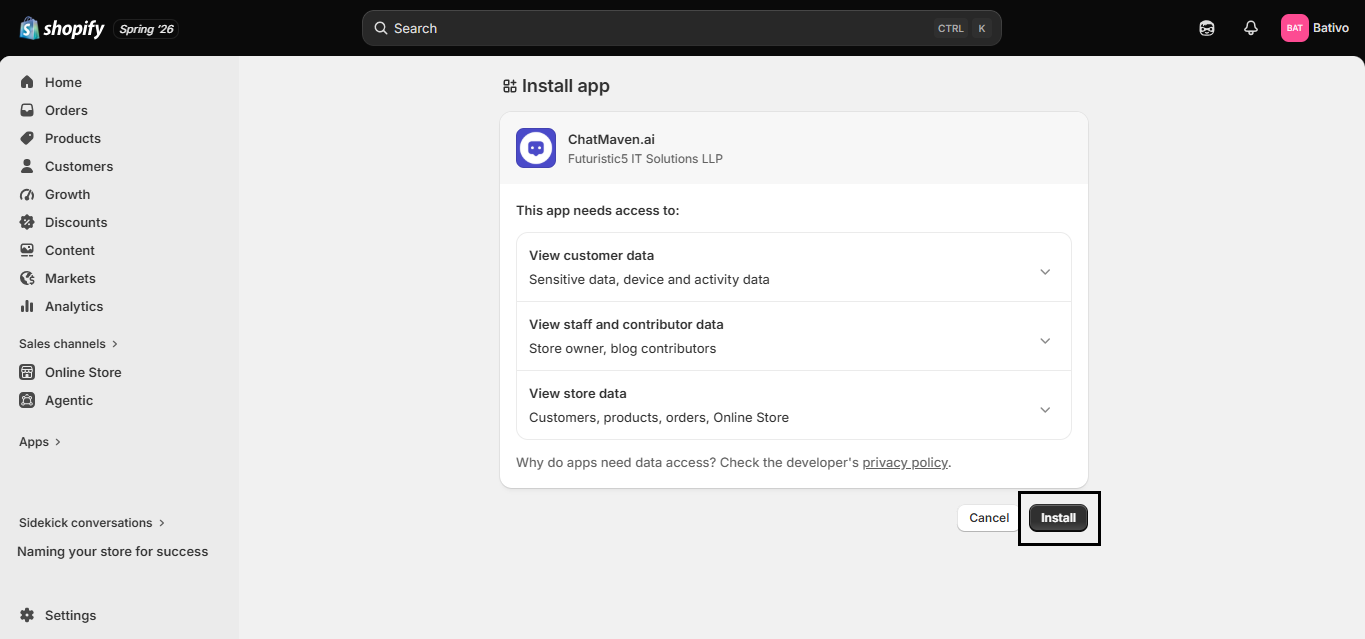
Shopify shows an Install app screen for ChatMaven.ai. Review the data access ChatMaven requests, for example:
- View customer data (sensitive data, device and activity data)
- View staff and contributor data (store owner, blog contributors)
- View store data (customers, products, orders, Online Store)
Click Install to approve access and finish the connection.
If ChatMaven.ai is already installed on this store, Shopify may skip this screen and return you to ChatMaven immediately.
Step 5: Confirm Connected
After a successful authorize, ChatMaven returns to Integrations and shows a toast: Shopify store connected.
On the Integrations grid:
- The Shopify card toggle is on
- The card may show a highlighted border while active
Open Configure again to confirm the left rail shows Connected, your store domain, and a Disconnect button.
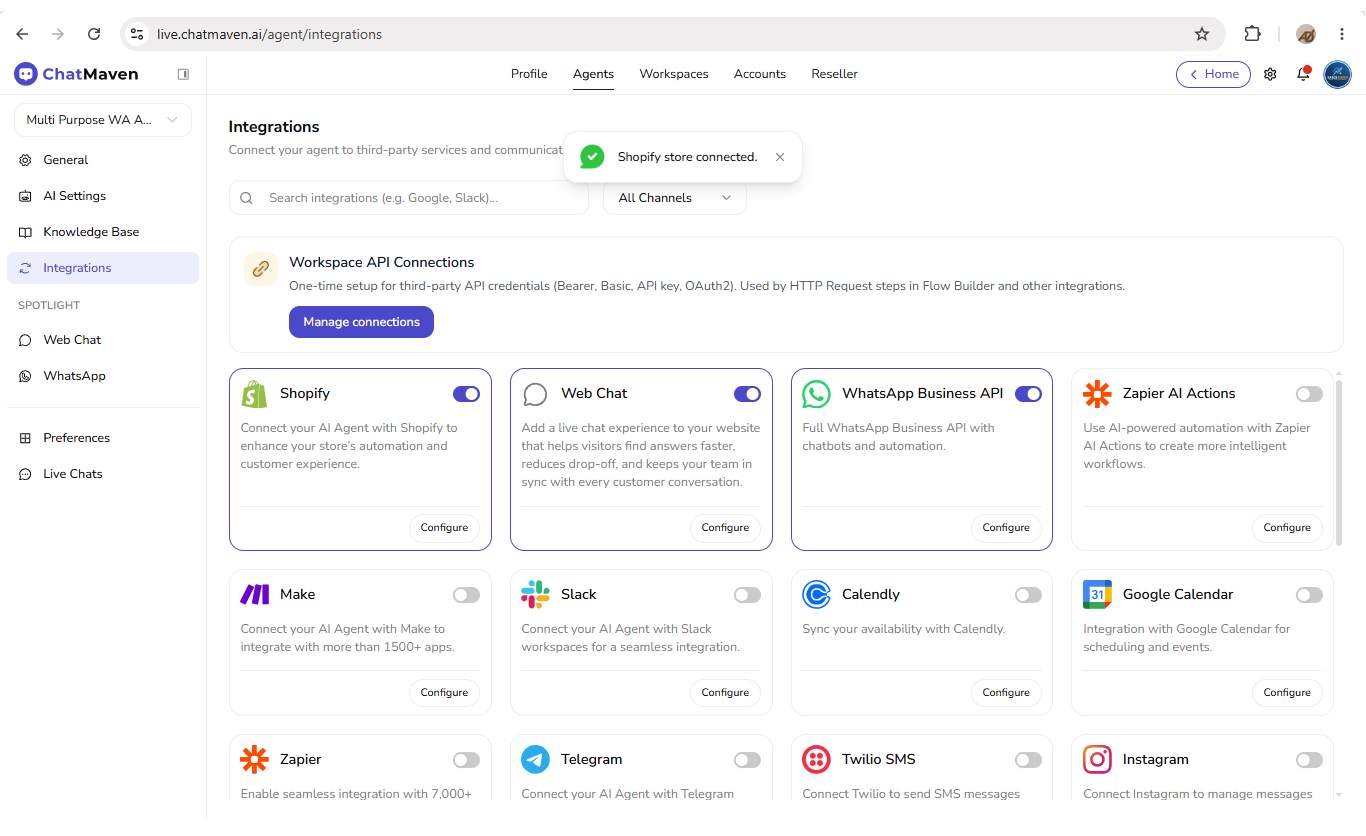
Keep the Shopify Integrations toggle on after connecting. If the toggle is off, turn it back on so the agent can use the store connection.
Disconnecting Shopify
To disconnect:
- Go to Agents → Integrations.
- On the Shopify card, click Configure.
- On the left rail, click Disconnect.
After disconnect, the store no longer shows as Connected, WhatsApp automations for Shopify events stop firing for that agent, and you can reconnect later by repeating the Setup domain + Install flow.
Recommended next steps
After Shopify shows Connected and the toggle is enabled:
- Add the chatbot to your theme — Embedding the chatbot on your store
- Open your storefront and send a test message (for example an order-status question)
- If WhatsApp Business API is connected, enable the automations you need — WhatsApp automations for Shopify orders
FAQ and troubleshooting
What store domain should I enter?
Use your store’s myshopify.com domain (for example your-store.myshopify.com). You can paste the full URL (https://your-store.myshopify.com/) if that is easier — ChatMaven’s Setup help text uses the myshopify.com form as the example.
I do not see the Install app screen
If ChatMaven.ai is already installed on the store, Shopify may skip Install and return you to ChatMaven with the store Connected. If connection fails, open Shopify Admin → Apps, confirm ChatMaven.ai is installed, then retry Connect with Shopify.
I entered the wrong domain or need to switch stores
Click Disconnect, then connect again from Setup with the correct myshopify.com domain and complete Shopify OAuth / Install.
Do I need an API key or custom Shopify app?
No. ChatMaven only asks for the store domain, then redirects you to Shopify to Install and authorize access. You do not create a custom app or paste an Admin API token for this integration.